Designing DNA Origami Structures
This week I am learning about the fundamentals of designing and building DNA origami structures. I should probably write a post just about cool stuff you can build with DNA origami to get you excited, but in the meantime, check out this cool TED Talk by one of the fathers of the field, Paul Rothemund. This post is going to dive into the fundamentals of designing DNA origami structures. Everything I present here I have learned from my lab mates at the MMBL lab.
Let’s get started! At the MMBL lab, we design our structures using an open-source software called cadnano, which was originally developed by the Shih lab. (There are some other software packages out there, too, but the cadnano package is the most popular tool currently in use.) If you are familiar with Computer Aided Design (CAD), this software is just like CAD software, but for designing structures made with DNA, not metal or plastic. The software relies on some basic rules that DNA structures always follow when they form the canonical double helix structure.

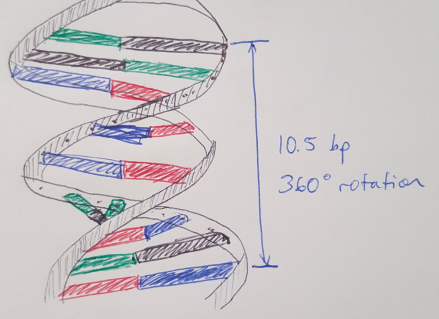
Figure 1 - Sorry for the horrible drawing.
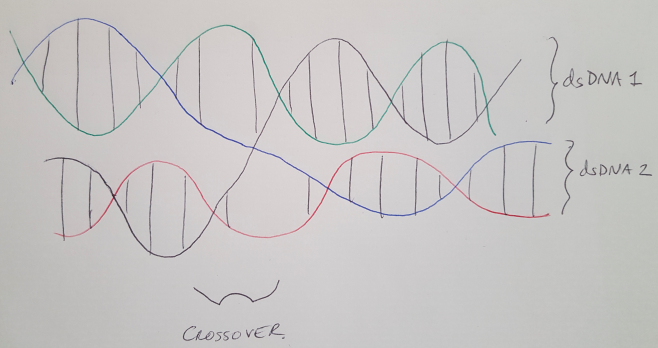
DNA double helices follow some precise rules that we can use to build cool structures. Here I’m going to focus on the helix-level structure but if you want more information on the fundamentals of DNA, you can read my earlier posts here, here and here. The first rule is that DNA helices naturally twist, and they complete a full rotation (360 degrees) every 10.5 base pairs, see Figure 1. That means each base pair contributes about 34.2 degrees of rotation. In DNA origami, we “staple” multiple helices together to create larger shapes, and these staples cross over from one helix to another at very defined points along the length of the helix [1]. Specifically, every 7 base pairs, we can cross from one helix to another, and these crossovers are spaced 240 degrees apart, see Figure 2 [1]. Recall that 7 base pairs x 34.2 degrees = 240 degrees. (For a better explanation, see reference [1].) Note that we always describe the helix as running in the +z direction from the 5’ end to the 3’ end. (I discuss what the 5’ and 3’ ends are here.)

Figure 2
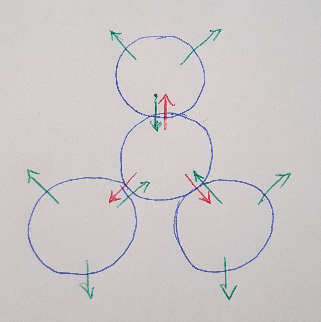
Now that we know we can connect helices together every 240 degrees, let’s imagine what a lattice pattern of helices would look like. If you started with one helix (represented as a circle, see Figure 3 below) then you could connect it to 3 other helices evenly spaced around it. If we expand this pattern outwards, we form a “honeycomb lattice” or hexagonal pattern [1].

Figure 3
In DNA origami, we typically have 2 components that we combine to form a final structure. The first component is a “scaffold”. This is a very long strand of single-stranded DNA that has a known sequence. In our lab we use the M13 scaffold, which comes from the M13 bacteriophage [2]. Since this is a known sequence, we can load it into our cadnano software and then the software will automatically know the sequence of the scaffold and the required complementary sequences of the staple strands, which are the second component that we work with. The staples bring the scaffold together in certain places, folding it to form a structure. This is why this method of building with DNA is called DNA origami - it’s because we are folding the scaffold into a shape. The scaffold is single-stranded DNA and so are the staples. When they bind together, they form double-helices. The staples cross over between helices, forming one giant structure.
One last note that I think is interesting: we use the M13 sequence bacteriophage because nature can make longer single strands of DNA more easily than we can. I want to write another post about how we actually make DNA, but for this discussion it’s interesting to note that we just extract the M13 sequence from bacteria and use it in our structures. The sequence is over 7000 base pairs and the bacteriophage can make it repeatably and at high yield. In the lab, we struggle to make sequences over 100 base pairs with reasonable yield. I guess it just goes to show that nature is still the best at making DNA.
References:
[1] Douglas, Shawn. “Cadnano tutorial 1.” 2008. https://www.youtube.com/watch?v=cwj-4Wj6PMc Visited 11/18/2019.
[2] Wikipedia. “M13 bacteriophage.” https://en.wikipedia.org/wiki/M13_bacteriophage Visited 11/18/2019.
