Docker Best Practices
In a previous post, I introduced the basic ideas behind Docker containers and using them on shared workstations. In this post, I want to build on that discussion by talking about some of the best practices recommended by experts when working with Docker containers. This is going to be a grab bag of topics, so feel free to scan through the headings to find information that is useful to you.
General Advice from Docker
The good people at Docker have some best practices that they recommend. First and foremost, they recommend that you do everything you can to keep your images as small as possible [1]. A good way to do this right off the bat is to be careful in what you choose for your base image - for example, don’t choose the official image of all of ubuntu 18.04 if you just need a base image of Python3 [1].
It is also possible to use multistage builds that draw from multiple bases if needed [1]. I think this discussion can get more complex so I recommend looking at Docker’s documentation if this sounds useful to you.
Docker engineers also recommend minimizing the number of separate RUN commands that you write in your Dockerfile [1]. I believe the reason for this is that every new RUN command adds a layer to your image, which makes the images heavier and less efficient [1]. If you combine RUN commands by using && and other bash tricks, then you can reduce the number of layers without loss in functionality [1].
If you have several Docker images that share some layers in common, consider turning the common layers into a base image that you draw from repeatedly [1]. This also makes your child images lighter and it makes your code modular [1].
Specifying Requirements
Part of the build process for a Docker container involves installing all of the necessary packages for your application. It is best practice to be very specific about which versions you want to install so that as packages get updated, you continue to install the correct versions that are compatible with your application [2]. For example, you don’t want to just install the latest version of Python3 - you should really specify that you want Python 3.6.9 if that’s what you have been using.
A cool trick for building a well-specified list of requirements is to use pip-compile. You can build a general list of the packages you need in a file named “requirements.in” and send this to pip-compile to build a list of all dependent packages and their current versions. The command is [2]:
pip-compile requirements.in > requirements.txt
Writing Good Dockerfiles
After building the same Docker image a couple of times, you may have noticed that the process of installing all the packages can really slow down the process. Moreover, it doesn’t really make sense to have to re-install the packages every time you rebuild an image if you haven’t changed the dependencies. Docker implemented caching to help speed up the build process and save packages from a previous build if they haven’t been changed [3].
Let’s look at how a Dockerfile is processed to understand how caching works. As we mentioned above, every instruction in a Dockerfile is another layer that gets added to the base image. So as the daemon works through the layers of the Docker image, it applies the following rules [3]:
1. If the text of the command has not changed, then it will use the cached version.
2. If the files in a COPY command have not changed, then it will use the cached version.
3. If the cache cannot be used for a given layer, then none of the subsequent layers will be loaded from the cache.
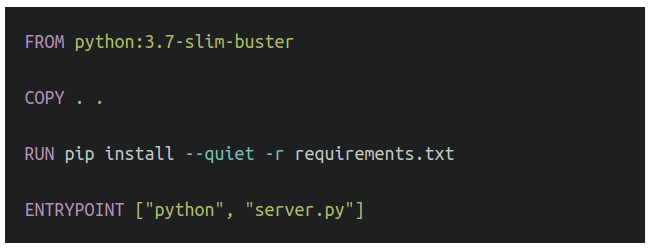
We can be strategic in how we structure our Dockerfile so that we only introduce new files when they are absolutely necessary for the Dockerfile to continue [3]. Another way to think about it is to introduce files and commands that are likely to change near the end of the Dockerfile so that we can draw on the cache for as long as possible. Let’s consider the Dockerfile shown below.

Figure 1 - Source: [3]
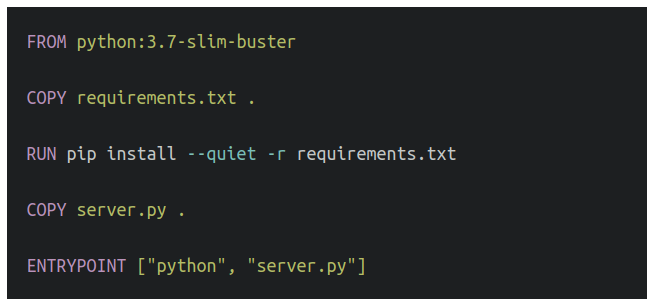
This is not written according to best practice because we are going to copy all the files over very early in our Dockerfile. So if I change something in one of my files, the build rules will force me to stop using the cache after this layer and I will be forced to repeat the installation process for all my dependencies, even if none of my requirements have changed [3]. A better approach is shown in Figure 2.

Figure 2 - Source: [3]
Here we first copy just the requirements.txt file that tells us what packages we need to install. Once those dependencies have been installed, we then copy the rest of the necessary files over. This is a much better approach because now, if I make changes to “server.py” and rebuild the image, I can use the cache to speed through the build process until I need to recopy “server.py”. If I have a lot of dependencies, this can save me a lot of time [3].
Data Storage with Bind-Mounts and Volumes
Docker has several ways of storing persistent*1 data that can be used by containers during runtime [4]. The preferred tool is to use a volume - Docker argues that this approach is easy to back up, migrate and use safely between multiple containers [4]. The volume itself is stored on the host workstation in the area dedicated to running Docker infrastructure, and can be easily mounted to any container [4]. The volume is managed by Docker [4]. I have to be honest, though, and admit that, although I have figured out how to create a volume, I have not figured out how to populate it with data (such as a training dataset) so I will save that for a future blog post when I figure it out.
The alternative to using volumes, although not preferred, is to use a bind-mount [4]. The difference between a bind-mount and a volume is that a bind-mount simply points the container to a directory located elsewhere on the host computer [4]. This is an easier setup for me to understand, but I believe it is not preferred by Docker because the directory that gets mounted to the Docker container is not managed by Docker [5]. Also, you need to reference the bind-mount using an absolute path which is dependent on the specific file structure of the host computer - if you want to be able to transfer your image between workstations, you will need to edit any references to the bind-mount accordingly [5].
One other thing to note about using either bind-mounts or volumes is that there are two flags you can use to tell Docker to use one of these storage devices [5]. The older flag that has been in use longer is “-v”, but a newer flag “–mount” is supposed to be easier to read and configure [5]. I have been using “–mount” and I have to agree that I prefer it because you can modify it with readable key-value pairs like “type=bind-mount” [5].
Footnotes:
*1 Persistent means that the data remains on the host computer even after the container has stopped and has been removed from the hard disk.
References:
[1] “Docker development best practices.” Docker. https://docs.docker.com/develop/dev-best-practices/ Visited 20 Oct 2020.
[2] Turner-Trauring, I. “Broken by default: why you should avoid most Dockerfile examples.” Python Speed. 27 Mar 2020. https://pythonspeed.com/articles/dockerizing-python-is-hard/ Visited 20 Oct 2020.
[3] Turner-Trauring, I. “Faster or slower: the basics of Docker build caching.” Python Speed. 6 Aug 2020. https://pythonspeed.com/articles/docker-caching-model/ Visited 20 Oct 2020.
[4] “Use volumes.” Docker. https://docs.docker.com/storage/volumes/ Visited 21 Oct 2020.
[5] “Use bind mounts.” Docker. https://docs.docker.com/storage/bind-mounts/ Visited 21 Oct 2020.
